Office Address
123/A, Miranda City Likaoli
Prikano, Dope
Phone Number
+0989 7876 9865 9
+(090) 8765 86543 85
123/A, Miranda City Likaoli
Prikano, Dope
+0989 7876 9865 9
+(090) 8765 86543 85


 by exldigital
Are you tired of missing out on customers’ Facebook messages? Are you struggling to provide better customer support and consistently losing valuable leads? If yes — then a Facebook Messenger chatbot is the perfect solution for you!
In this blog, I will explain how you can use AI chatbots for Facebook Messenger to improve customer support, boost engagement, and never miss another lead. I’ll also show you how to create a simple Facebook chatbot for Messenger in just 5 minutes using ExlDigital — a powerful platform designed to help businesses automate conversations and improve customer service on Facebook.
Moreover, I’ll walk you through how you can integrate Facebook live chat to provide even more personalized customer support by collaborating with your team members. With the right tools, you can easily enhance your customer experience on Facebook, respond faster, and keep your audience engaged around the clock.
What is a Facebook Messenger Chatbot?
A Facebook Messenger chatbot is a powerful feature that allows businesses to set up automated replies to common customer queries on Messenger. With a Messenger chatbot, you can ensure instant customer engagement by responding to frequently asked questions automatically, freeing up your time to focus on more critical business operations. Once you set up your Messenger chatbot, it can handle basic inquiries, provide customer support, and improve overall customer experience on your Facebook business page.
Signing up on ExlDigital is simple and quick. Just head over to:
👉 https://exldigital.com/register
Enter your name, email, and password. Carefully read and agree to the terms and conditions of ExlDigital.
Finally, hit the Sign Up button — and you’re ready to start!
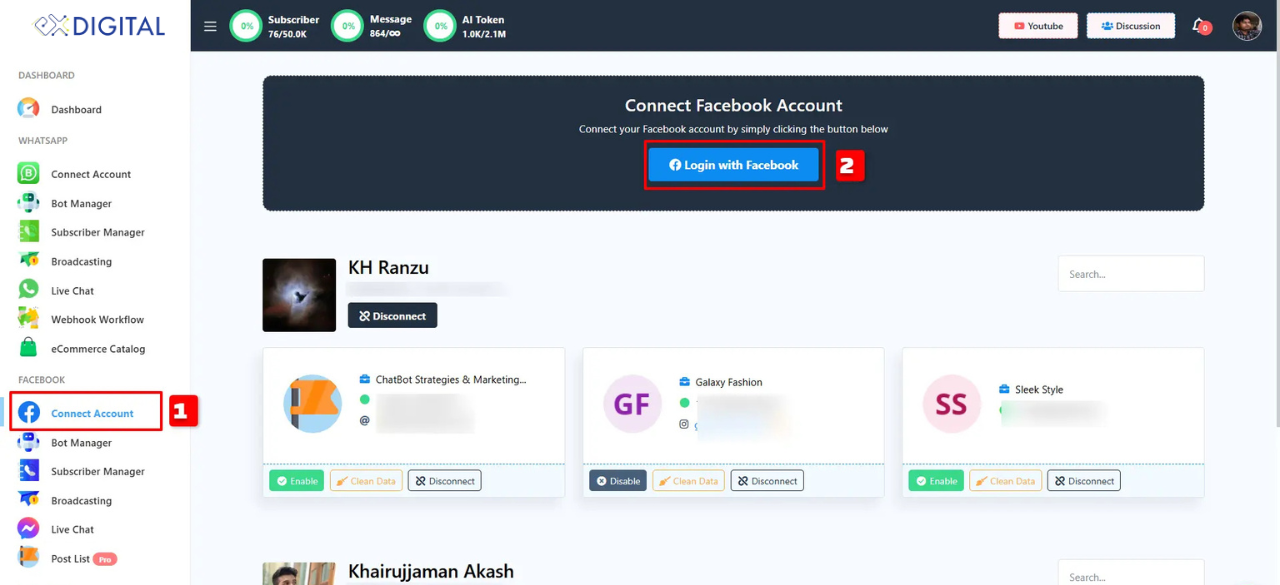
Go to the Connect Account option under the Facebook section. At the top of the screen, click the button Log In With Facebook.
Once you connect your Facebook account with ExlDigital, you can start building your Facebook Messenger chatbot. This will allow you to set up automated replies, manage customer inquiries, and enhance your social media marketing strategy by improving your Messenger customer service.
For this blog, we are going to make a simple Facebook Messenger chatbot that will take only 5 minutes to build. Suppose you are an online English language tutor who wants to sell your guidebook and online course through a chatbot. I’m going to show you here how you can easily create a chatbot for this purpose in just 5 minutes using exldigital.
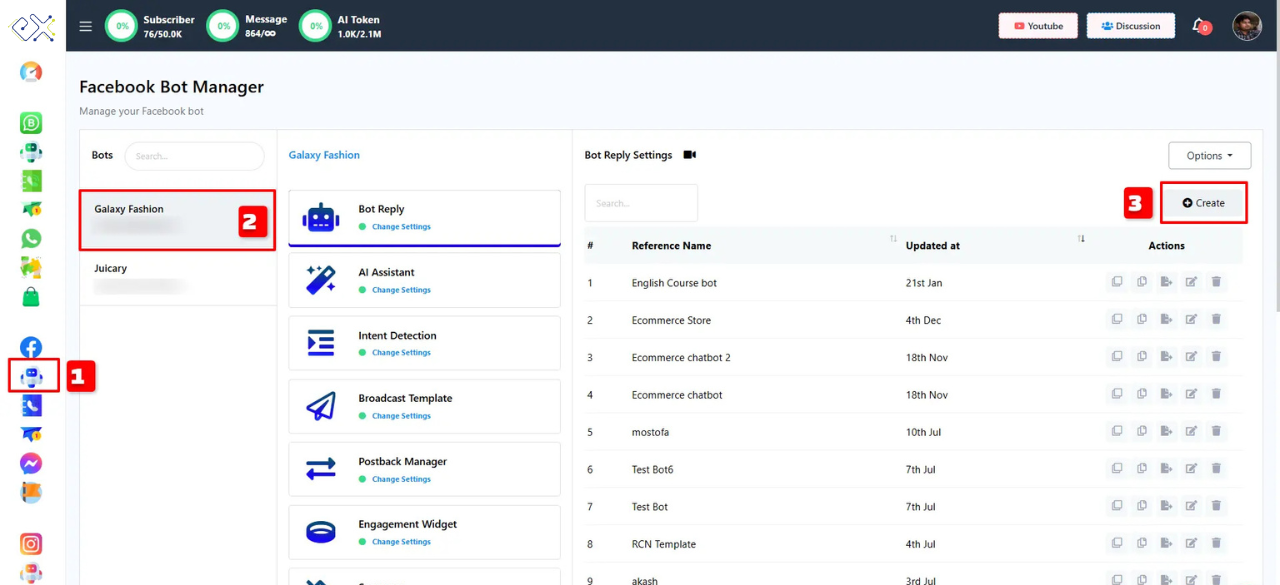
✅ First, go to Bot Manager under the Connect Account option on exldigital.
✅ Next, select the Bot Account where you want to make the bot (if you have multiple Bot Accounts available).
✅ Then, from the Bot Reply option, click on the Create button to create a new bot flow.
This process helps you quickly set up an automated chatbot that can handle user inquiries, promote your online English course, and even sell your guidebook via chatbot on Facebook Messenger.
By using exldigital’s chatbot tools, you can enhance your online course promotion efforts, reach more students, and provide automated replies that drive sales and engagement.
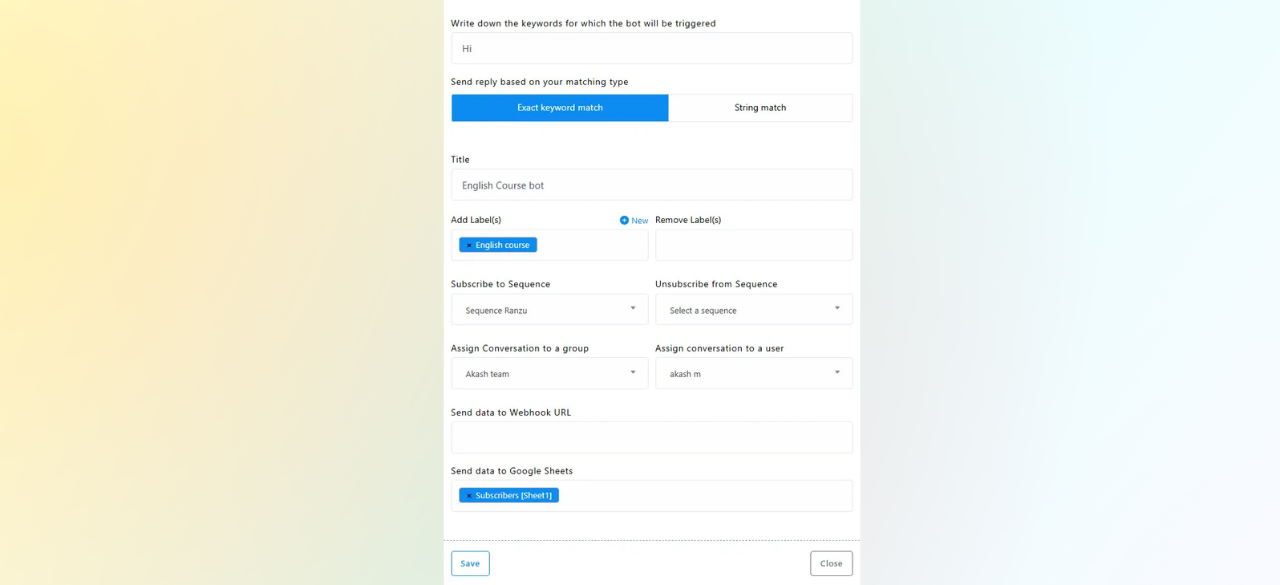
✅ Step 1: Start Bot Flow Component
Trigger Keywords → Add words like hi, hello, hey to activate your chatbot.
Bot Title → Give your bot a clear, descriptive name.
User Labels → Tag users for better segmentation and tracking.
✅ Advanced Options
Sequences → Set up automated message sequences.
Team/Agent Assignment → Assign chats to the right team or agent.
Google Sheets Integration → Auto-send user data for reporting & analysis.
🔹 Once set, your Start Bot Flow in exldigital is ready to engage, convert, and track users efficiently!
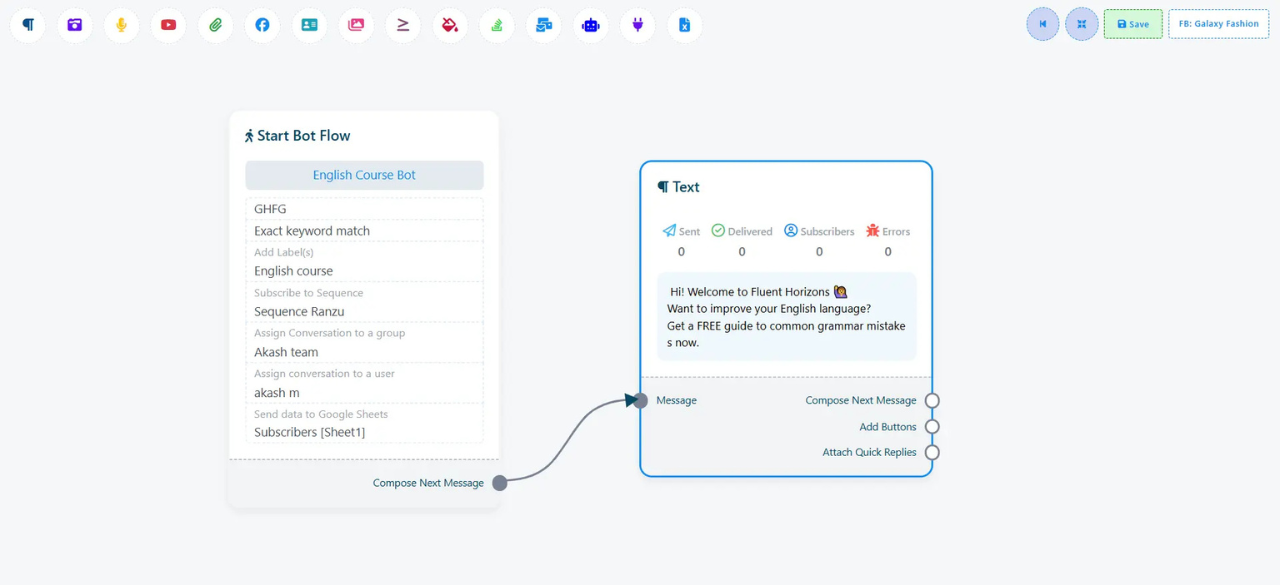
Hi! Welcome to exldigital 🙋♂️ Ready to boost your English fluency? Get your FREE grammar mistakes guide now — perfect for English learning, speaking, and writing improvement!
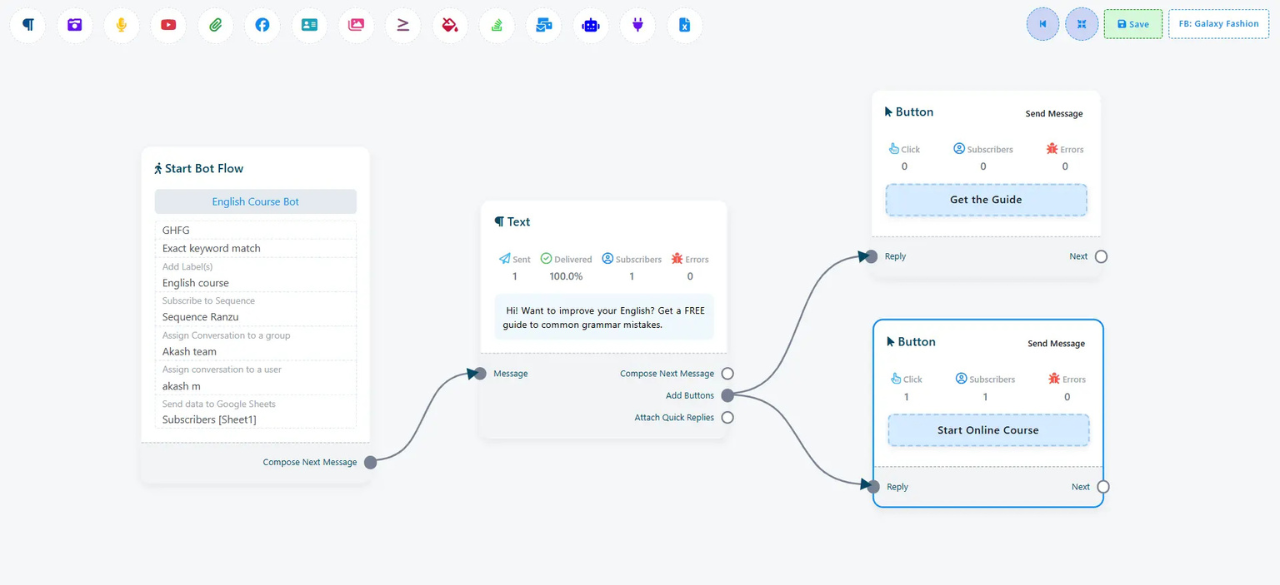
We want to give customers two clear options:
✅ Option 1 → Get a Guidebook
✅ Option 2 → Start an Online Course
Here’s how:
1️⃣ Drag Two Buttons from the Add Button section in exldigital.
2️⃣ First Button → Double-click to configure → Name it “Get the Guide”.
You can set actions like:
Send a Message → Auto-reply to user
Send a Flow → Trigger a preset chatbot flow
Send Website Link → Share your product or service page for traffic
Start Sequence Campaign → Run automated follow-ups
Assign Agent → Shift chat to human for live support
Send Data to Google Sheet → Track button clicks for analysis
Send Customer Data to Website → Personalize user journey on your site
3️⃣ Second Button → Name it “Start Online Course” and configure similar actions.
We offer users two options: Get the Guide or Start Online Course. To give them the right reply and collect details, follow these simple steps using exldigital’s User Input Flow.
✅ Step 1: Add User Input Flow
Drag User Input Flow from the component library onto the Get the Guide button.
Double-click, select Add new input flow, name it: English Language Course.
✅ Step 2: Integrate Systems
Use Webhook to send user data to Shopify, WooCommerce, etc.
Or use Send data to Google Sheets to store user info.
✅ Step 3: Add Questions
Drag in a Question component.
Set type: Free Keyword Input → Ask:
“Great! Just enter your email below and we’ll send you the guide.”
Set reply type: Email.
Save the email in a Custom Field or System Field.
✅ Step 4: Add Thank You & File
Add a Thank You Message to thank users for their email.
Add a File Component to deliver the guide.
✅ Step 5: Set Online Course Flow
Name it: Online English Course Input Flow.
First question (Multiple Choice):
“We have two shifts available. Please select which shift is most suitable for you.”
Second question (Free Keyword Input):
“Please provide your email address to receive further details and confirm your course enrollment.”
Add final Thank You Message.

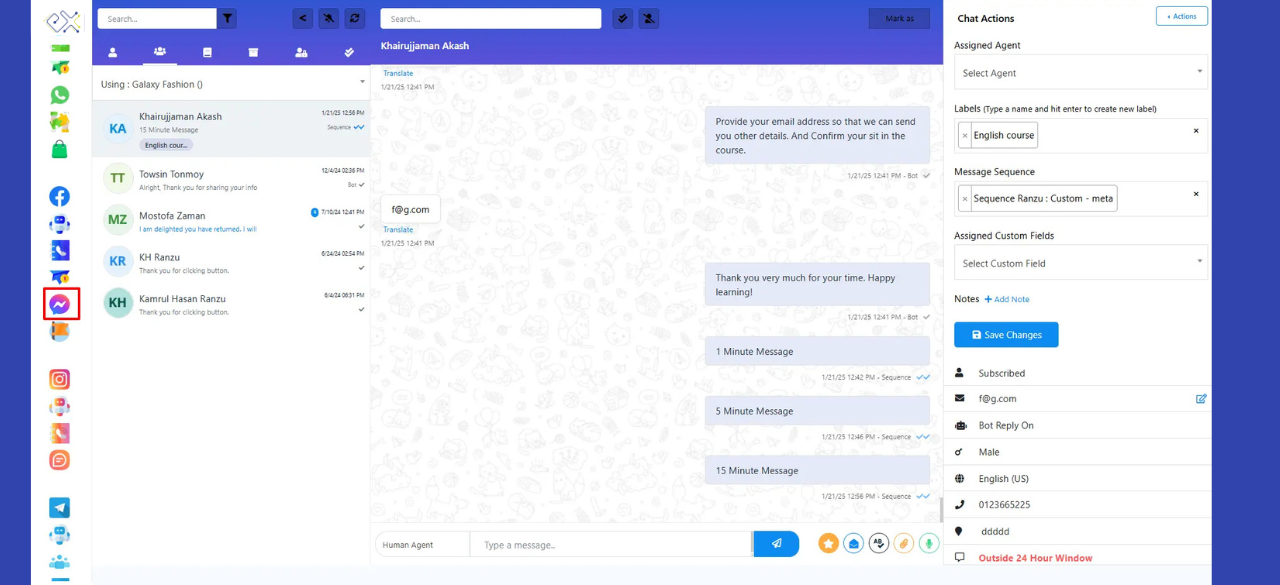
Step 4: Check Out Live Chat
By saving the bot flow, you put your ExlDigital bot online. Now, whenever customers message you on your business page or personal account, your bot will auto-reply. Your only job? Oversee the bot chats and step in when a customer needs human help.
Using ExlDigital’s Built-in Facebook Messenger Live Chat (with SEO boost):
✅ Go to your ExlDigital dashboard.
✅ Click Live Chat under the Facebook section.
This feature ensures real-time customer support, boosts engagement, improves user experience, and enhances SEO performance by keeping response times fast and interactions smooth.